Monday, October 31, 2011

Playing Catch Up (again...)

Howdy again folks!  Yeah I know it has been another 2 months again but not quite so there is improvement to the situation!  So much has happened since our last time together so I should probably get started into it.  To list it all out before the pictures interrupt there has been 1) module construction and completion, 2) my first train show to participate in (absolutely awesome!) 3) UP 1995 coming near when I actually had some time to chase for once and lastly 4) the open house up at the club.  So you can see that a lot has been happening, and that is only train stuff, not the school grades being rather awesome currently, the B-24 and B-29 bombers visiting, traveling, and my bike being stolen!  The last one not being good and all, but still a lot of fun stuff has been going on.  Inorder to make this a smaller post, I will break up the 4 named things above into seperate posts.  Now on to the meat of the update!

Module Construction and Completion:
This was one of those projects that kind of sneaks up on you.  You start with a couple of months of time to finish, start taking your time, getting all of the details right and then, BAM!, only two weeks to the show and you haven't even painted the foam, or installed it, or even finished the frame...


However, I got the fire under my butt and got a move on.  The scene I set out to create comes from an image on the Trinity Railway Express (TRE) line between Ft. Worth and Dallas that just called to me for some reason.  That picture will be posted later in a comparison once this thing is finished to my full satisfaction.


Here is the module with the foam fully carved and rasped, if that is a word.  I made the drainage canal by trimming pieces off of a curved cut out of foam with an exacto knife, regular knife, and then a rasp.  That got REALLY messy for a while.  The hill was made the same way, major parts by big tools, details by rasp.  The unforseen side effect of this approach was the natural looking uneven land.  Fortunately I am an engineering student so designing and building a bridge was pretty simple.  That and the prototype images were a big help.  The most fortunate thing though was that I had designed the bridge deck to be as thick as the cork roadbed so they matched up perfectly.  I painted it with the sidewalk color from the Woodland Scenics street and sidewalk set.  I plan to weather it a little in the future.  To transition from the sub-roadbed (plywood) to the scenery foam level I applied plaster then evened it out with a piece of cardboard which made the grade of the sub-roadbed.  I was rather glad that it turned out as well as it did.  Next I added the small hill on the right of the module.  Then I used N scale cork to create the roadway on the left.  I felt that making it sit higher than the scenery was more realistic.


And above is the (95%) finished product!  The club standard is to ballast with WS medium gray ballast and my girlfriend painted the rails with a flat brown paint pen.  Took me 30 minutes to test a 9 inch section, she did both mains in less than that...  I love that woman.  Anyways, I then laid the flex track down and soldered on the feeders to the bottom.  More on that in a later post!  I applied the ballast by first using a piantbrush to apply Elmers white glue around the bottom of the tracks and then sprinkle on some ballast with a plastic spoon.  Once that was dry I sucked up the loose pieces with a vacuum and ballasted the rest.  That was the typical pour it on, brush it gently into place, and then use a syringe to apply a 50/50 water glue mix.   Once that dried I vacuumed up the loose stuff and fixed the empty spots.  Then I turned my attention to the road.  Since I did not want to mix more plaster (messy) or get sheetrock putty (it can flex better than the plaster during moving) I turned to other methods.  What I came up with was manila folders!  "Manilla folders?  Surely you have lost your mind!"  Truthfully I have not! (And don't call me Shirley -Thank you Leslie Nielsen)  I was able to trim the manilla folders to fit onto the cork road guides and voila!  Instant road that flexes and stretches!  I attached the folder with track nails and Liquid Nail then painted over it with the black paint from the WS Paving Kit.  Then I painted some quick stripes and markings, weathered it with powdered pastels, then walked away.

For now that is all I have to talk about regaring the module. The following posts will contain the updates on the other aforementioned events and cover why this module is only 95% done.  At this point, it has taken me several days to write this, so, maybe I will get around to the others...  Who knows eh? 

As always, good luck and have fun!

Sunday, September 4, 2011

Aaaaand we're back

Howdy again folks.  It's hard to believe it has been almost two months since I posted here.  I gotta tell ya, having a full time job and now full time school and job is a time ruiner.  However, it has not prevented me from making progress on train related tasks!  I have finally gotten back to a groove where I can make posts on here.  And no I don't feel bad it took this long.  Some of the better blogs out there haven't updated in more than two months.  So there.

Anyways, I have been saying from the beginning that this site is for my HO and N scale endeavours and yet, up til now, there has been no N scale posts.  Change is finally afoot!  I got out the camera and took some quick shots of the 3x5 simple loop layout I have been working on for a while now.


The above picture is an overview of the layout.  I went as simple as possible.  A single loop, one industry, short passing siding on the back, and minimal track.  It is currently acting as a place for me to practice my scenery techniques until I can finish it and sell it.


 This is the good ol' MRC Prodigy Express DCC system.  It runs all of my N scale locos without nary a problem.  This will probably be my system for the next several years.  It is simple, incredibly easy to use, and a pleasure to operate.


This is the space underneath the layout.  Cluttered and crazy, but I know where everything is.  To cut down on dust issues, I cover the layout witha  simple blanket that can fold up and lift off without damaging details and trees.


This is my mirror for viewing the passing siding on the back of the layout without having to lean over the front.  It is a simple automobile blind spot mirror mounted on short bit of dowel.  The curvature allows me to see the entire siding and main line in the back.  Very handy.


Here is the only industry, an Walthers New River Coal Mine kit.  It is weathered, but I have not finished adding lights and details to the inside.  A siding begins on the right hand side of the layout and curves around to the front where it splits into two lines.  The mine can be served by up to three tracks, but I wanted to add a truck loading area as well.  This area is currently under some extreme renovations.  The Atlas Southern Pacific GP-40 seen here is the first N scale locomotive I ever purchased.  I was so excited until I realized the N scale cars I had purchased with it had rapido couplers and the geep has accumates...

And there it is.  The beginnings of my N scale experiences.  I cannot wait to finish it and get on to the next one.  Oh, the woes of being a modeler :)

To finish off the day, I am nearing hopeful completion of phase one on the big HO project.  I have been trying for weeks to get it going and everything that can go wrong has so I a bit behind and exasperated.  Until next time, good luck!

Wednesday, July 6, 2011

Ugh...

Yup.  Summer classes are really taking their toll...  I have found my camera and its charger so next week when my class is over I will get in on the N scale stuff.  Also, I have HO scale joy so there will be that too.  Look back next week for explanations.  For now, I am going to go continue typing...

Thursday, June 9, 2011

Go figure.

Okay so I wanted to get started on showing some of the N scale equipment and layout I have.  However my cameras battery has died and I cannot seem to find the charger.  This weekend I will have one though so I will charge up and get some pictures for you nice folks.  Hopefully summer classes do not get too much in the way.

Saturday, May 28, 2011

The Spray Painting Works!

Sort of!  Okay, to be perfectly honest, I love it.  It is cheap, simple, quick and it works.  However, some people may not like it.  To them I say: do what is best for you!  Model railroading is a large open community and if we didn't do what we wanted, it wouldn't be fun.  Me, I am going to use spray paint.  Since I started looking into this weathering system back with the original use on the Geep I have made some advances in technique and application.  Let's review:

The spray paint cannot be thought of in an airbrush way.  You cannot thin it down, dial back the pressure or ramp it up, and you cannot affect the spray area to smaller or larger area.  It is constant, in all manners. 

"But if it is so hard to change it, why use it?"  Simple.  It's cheap.  And because I have been able to mostly counteract the negative things above. 

Now for how I advise you use it.  First is selecting the paint.  Contrary to intuition you do not want to go for the name brands or the "quality" ones.  These are good for other applications but not this.  They put out a lot of paint for good smooth coverage.  Not the ideal situation for weathering.  Pick up the store brands or generics.  These give the smallest amount of paint required and also give more bang for the buck.  Be very sure to get flat paints. 


The gloss will shine once they are applied and look off.  Always be sure to go flat unless you need shiny.  Once you have the paints, make one of these:


This is the template I made for basic shapes.  Mine is made from a box I got a sweater in.  It is thin, stiff, and was close enough I didn't have to get up.  :)  The bottom is for getting that dust or dirt color along the bottom of cars, and the top is for the locomotive as it has the indentation for the wave.  The wave is where the aerodynamics of the train causes a rise that drags dirt up with it.  Usually this is located around the cab, but prototype photos show the best places.  There are lines and triangles for various streakings and point weathering.  The 4 on the right are for showing where the dirt is kicked up onto car ends from the other cars wheels.  They are in gauge with the rails and wheels.  If you do not want a noticable line showing you used a mask, hold the template about an inch or two from the model so that it can fade around it.  For crisp lines that show specific edges, hold it as close as possible.  You can add or remove things as needed.  If the pattern openings are too close together, then use painters tape to cover over unwanted openings (as seen above).

Now for colors.  Choose what you like best.  I have a white for fading the overall car, a tan for dust and other dirt effects, and a black for grime and wear.  You can have more or others, it is really up to you!

Last but not least, technique.  Since you cannot control the amount of pain being sprayed, you must control the movement.  Short quick passes are best.  If you do not want a lot of weathering then do not spray at the model but at the ground in front of it.  Some of the spray will carry onto the model without being overkill.  Remember, as with airbrushing it is easier to make it heavier than to make it lighter, so go easy and check your work constantly.  I do every few passes just to be sure. 

A downside is that the spray is not as fine as an airbrush so if you look reeeeeeeally closely you can see the dots of paint.  This can be negated by using pastels or other methods of weathering to even out.  Ultimately it works for me, and I have enjoyed it immensly.  Here are two of the cars I have used this on:


So there you have it.  A neat and simple way to weather your cars.  As always, feel free to leave questions and comments.  Have fun and good luck y'all!

Saturday, May 21, 2011

Sound Decoder

Since it has been awhile, let's review.  I have Bachmann GP-7 locomotive, I am quite fond of it, but it needed work.  I have already added some MU details, sprayed it til it looked dirty and tried to add a sound decoder.  That last one did not end well.  After melting the poor decoder (again, literally melting it) I sent it in to Digitrax.  The lovely people there simply replaced it free of charge as it was under warranty without asking any questions.  Quite fortunate really considering I did not have the money to pay for a new one, and I'm pretty sure it was my fault it died.  But I digress...

I promptly installed the new decoder and have run it several times down at the club.  Not a problem has arisen and boy am I happy with it.  It sounds nice and was a good cheap decoder, on $45.  Much better than the $100 of some others.  Now that it works, I can review it for all of you lovely people to know about.  This is the SFX0416 SoundFX Decoder.  It has a 4 function output but does not control direction, speed, etc.  It can do lights but that isn't my forte.  It comes preloaded with sounds for a steam locomotive or a SD 38-2.  It comes with a capacitor for uninterrupted sound on dirty track and simple 28 mm speaker. 

Good stuff time!  I have been running this thing crazy to see how it is.  F. U. N.  I am now spoiled on decoders because of this thing, and I want sound in everything.  Running a train around a large multi-level and -mushroom layout is fun, but when you can hear it coming, going, blowing its horn, or anything like that just beats all other things I can do to that locomotive.  But enough gushing.  I installed the decoder by splicing the power wires from the decoder to the main power leads.  This put it on the same circuit as the factory decoder.  The speaker was a bit of a pain to put in.  I had to unsolder it from the decoder inorder to slip the wires through the appropriate gaps in the frame.  I took this time to also lengthen the connecting wires to ease the "fun" of installation.  The worst part though came when I had to put the speaker in the baffle in the fuel tank of the loco.  The enclosure is 1 inch in diameter and the speaker is 28 mm.  1 inch = 25.4 mm approximately so you see the problem here.  So, I got out my Dremel, put in a grinding wheel, and got to work.  Working slowly so as not to overheat the speakers electronics I made the speaker a little smaller by removing the metal around it until it fit.  That took 3 hours.  Yeah.  That was why it was a pain.  However, everything fit and ran beautifully so it was worth it.  The sound decoder found room under the long hood behind where the factory decoder plugs into the pc board.  The capacitor fit at the very end of the short hood infront of where the factory decoder sits.  Below shows a picture of how the decoder fits in with the rest of the locomotive.  The two wires going down the sides of the frames are the speaker wires.

Here is the speaker:


I was going to do a video to display the sounds of the locomotive and decoder, but my phone is odd on recording the sound and my camera battery is dead and I lost the charger...  If I can get one I will post it.  So in conclusion, the decoder is worth it since it was cheap and realiable and gives the proper ambience needed for railroading.  Sound decoders are definetely worth the time and money and I highly suggest them.  Until next time!

Friday, May 13, 2011

Car Sorter

Okay finals are over, and I am barely alive.  I needed to get better quick to deal with the graduation and commissioning ceremonies of today.  So to heal myself, I purchased several new cars, one from Exactrail!  Platinum Series!  Ooooo it is pretty.  Buuuuut more on that later when I do some reviews.  For now we shall suffice it to say I have recovered. 

In the meantime, I found a neat product.  It is called Yard Office.  I found it on Model Railroader Forums, but I cannot remember who had the link but here it is:

http://musicmixradio.com/yardoffice/

Within the program you can select many options on how to organize and view cars, locomotives, and even buildings and scenery products.  It is in an Excel Spreadsheet format, with cells representing different values such as roadname, type of car, scale, even maker!  I have been having fun with it entering in my HO stuff.  By next weekend I should be able to have all of my N scale in it as well.  Here is a screenshot of how it looks:

The best part of all:  it is free!  Yes, you heard me, free!  However, this is for a mostly trial thing where not all options are available.  I haven't had much of a chance to discover what isn't available.  However, I may soon pony up the 30 bucks to get the whole thing as it is so dang fun!  So give it a shot, and as always, good luck to all of you.

Saturday, May 7, 2011

Happy National Train Day!

Everyone please celebrate accordingly.  I am going out for some train watching.  Have fun!

Monday, May 2, 2011

The caboose project

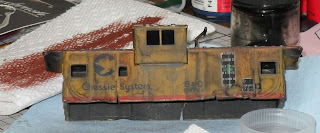
Okay so I bought the Chessie System geep and it didn't look right.  It seemed ...lacking.  I wasn't sure why so in looking at a book with a lot of pictures of the Chessie back in the day it hit me!  There was not a caboose on the end of my train.  I felt like that was what I really needed to round out the short train I have.  So I head down to the lhs and scrounge through the piles with no luck.  When the owner asked what I was looking for, I told him and he said he would order it for me.  I thought "hey this is cool, shouldn't be expensive either."  Turns out it was $15 bucks for a Bachmann Chessie caboose...  While I have enjoyed their geep, their caboose is, well, crap...  Seriously few details, sits up way to high, no running boards, no grab irons, no window glass, no nothing.  And for the same price I can get a beautiful Athearn model.  So I set to work making something out of not much.  First, I removed the trucks and wheels.

That is all I removed.  This is as simple as it comes.  I bent the smokestack accidentally when it fell from my hands during the removal process.

Here is the underside.  Pretty typical.  I kept this part in case I needed parts later.

Next I dissassembled the major components.  Here we see the body, cab, underbody, and weights.  Typically this sort of disassembly isnt necessary.  However, I wanted to paint the interior of the caboose black.  This makes it look more prototypical since it cancels out a lot of the light that shines in those windows.  I brush painted some Polly Scale Engine Black on the interior.  Spraying would have gotten overspray out of the windows onto the body.


The result is seen above.


The above photo shows the exterior after a weatherwash and body work.  I wanted to smooth the bottom of the body so it would work with the next major part of the project.  I also melted teh overhanging roof parts to lend credibility to the "wreck" look.  The weather wash is a simple weathering technique that is commonly used.  It involves mixing a few drops of india ink (or in this case, a whole lot) into a bottle of 70% isopropyl alcohol.  Then you drag a brush load of it over the surface you want to weather and the wash does the work.  The alcohol quickly goes into the smalled nook and cranny of the surface and when it evaporates it leaves behind the ink which highlights the smallest parts.  A fun technique with a lot of potential.  Especially since it can be as light or dark as desired.

After the first two washes, I trimmed some painters tape into a thin strip and layed it where the walkway should have been, if this model would have had one...  Then I drybrushed some model master rust onto the roof to simulate use and abuse.  Drybrushing is done by putting a small amount of paint onto the brush, wiping all but a trace amount off on a paper towel, and then lightly brushing the surfaces.  Here I went pretty heavily.
The above photo is the during of drybrushing.

And here is the after photo.  Worked pretty well in my honest opinion :)


I did a little weathering with powdered pastels to even the overall look out.  I also cut into the body to make wreck cracks.  Once that was done, I sealed the powders and washes on with a coat of Testors Dullcoat.  I dullcoated before the windows were added because for some reason it "frosts" the windows.  I found this out the hard way...  Another hard lesson is to not dullcoat until you are very sure you are done.  If you apply a wash with rubbing alcohol over dullcoat it turns all of the dullcoat white.  Again, hard lesson...


Now for the next part.  I needed a material to make windows, and when I found clear styrene sheet, I almost passed out at the sight of the price tag.  There was no way I could use that stuff and call this a blog for modeling cheaply...  When I got home that evening, I decided to open my new racquet ball goggles.  As I was struggling with the bad word blister packaging, it hit!  Use that stuff!  There is always a lot of it and normally it just gets thrown out.  So I cut it into the right sizes and it worked beautifully!  I was even able to use and Xacto blade to carve cracks and holes into the windows.

Then came the next major part.

I wanted a simple flat car for this thing to be towed on.  So again I went to the lhs and found a perfect fit.  A Walthers Trainline 50' flat car.

I won't lie to ya, I got this from Model Railroader magazine.  The article showed how to weather a deck and it worked perfectly.  I painted the deck reefer gray and then a few individual boards with the various colors above.  Then I got all over it with a weather wash of heavy concentration and then powder pasteled the snot out of this thing, followed by a quick dullcoating.  It was a quick job and resulted in a great looking flat car that has been around the block a few times.  Then came mounting the caboose.  To keep it in place on the prototype, support bars were placed in the points along the side of the flat car and it was strapped down.  To do this I trimmed some toothpick bodies to size and then test fit.  When I was happy with the results I stained them with the weather wash.


After they dried, I put them into the load lugs, and settled the caboose into its new home.  Then I detailed the caboose's wheels and axels and built a small carriage for them.  Then I was finished!  Here, ladies and gentlemen, is the long awaited final product!

Ain't it a beauty?  I am so glad at how it turned out.  Even the guys at the club who have all been doing this stuff for years approved of it.  So anyway, this has taken a good 2 hours to write so I am now going to go take a nap then play with trains some more!  Good luck in your endevours everyone!

Saturday, April 30, 2011

Finals...

Enough said right?  I will be back Monday evening, then not until the 14th when the whole ugly mess is over.  I hope it all goes smooth.  Congratulations to my girl on graduating!  Until next time y'all.

Monday, April 18, 2011

New (to me) Weathering Concept

Okay, so the idea of weathering with an airbrush has been around for awhile.  Basically, you used compressed air from a can or a compressor motor to pull a vacuum across a jar of paint that is mixed to your liking then applied as lightly or darkly and narrow or wide as desired.  However, compressors are expensive.  I got a cheap Badger Airbrush starter about a year ago for $25 but never bought the $250 compressor.  I used the canned air but at 15 dollars a can, it adds up quickly since they are basically one day use only.

On the latest project that I finished (that is coming soon I promise!) I got a random bit of inspiration.  I saw my general purpose can of black flat spray paint, and to my surprise, its use was a success!  Once I ran some tests, I set to using this to a new advantage on the quick and cheap weathering front.  Here is my Cheesie Geep before, with the protective tape over the windows (lights and numberboards will be covered later, I just didn't get a picture).  It is regular painters tape, cut with an Exacto blade to fit the windows.

Next I took the shell outside and set it on some newspaper I was using as an overspray protector.  Then, I made several quick passes with the spray paint shown below, starting before the shell and ending the pass after the shell, giving a good smooth coating on all sides, ends, and hood tops.  *NOTE: always test each can, each time, as performance can always vary.  This is very very very very important*


Next is the picture of the results.  You can also see the tape on the numberboards.


Here is the final result!


The only things done since have been painting the fuel tank and around the exhaust stacks.  That was done by masking off the loco outside of the top area around the stacks and then cutting a hole in a sheet of paper to spray more accurately with.

End result: a loco with a basic weathering job that doesn't go overboard, looks acceptable, and still gets good reviews from club members.  The total price: <$5.00  The total time to complete (including taping the windows): <45 minutes

Personally, I am glad it worked.  Next time will be the big project I was working on for two weeks.  Happy Railroading!

Thursday, April 14, 2011

Colorful power in Aggieland


I got lucky and caught this manifest with 5 engines and 4 Class 1 Roadnames.  I especially enjoyed the last horn blast.  I apologize for the shaky video.  It was from my phone and my seasonal allergies are in full bloom.  I recently finished up a major project and I will post the results here soon.  Editing photos takes longer than thought, and even longer when you leave the finished product at the club...

Sunday, March 27, 2011

Update 3/27/2011

Well, the sound decoder post will have to wait.  I ordered and recieved a Digitrax SFX0416 sound only decoder, installed it, only to have it burn out the next time I put it on the rails.  It worked for the first attempt, but then on a different system it melted.  Literally.  The pic shows the damage to my engine's shell...

Now, this is no knocking of Digitrax or their products.  They are actually quite nice, both the service and product.  This was my first sound decoder, and I made a mistake somewhere along the way, not them, and they just simply took it back in for repair.  I have to admit that it was beautiful  hearing the sounds of a train coming from my locomotive.  Nothing like it in the modeling world.

However, let's get started with other things.  The locomotive above is a Bachmann GP7 painted in Chessie System scheme, number 5606 (B&O).  It was about $55 through Micro Mark.  This is probably the part where someone says "Bachmann is crap/not worth the money/something negative."  However, having ran this locomotive over half a mile (in 1:1 scale), I have to disagree.  The locomotive comes equipped with an NMRA compiant DCC decoder.  There is room in the fuel tank for a 28mm speaker.  The motor is exceptionally quiet and causes very little vibration when moving.  It has a reasonable drawbar pull and can do almost anything that other "better" locomotives can.  There are a few downsides though.  It needs a little speed to get through turnouts despite both the wheels and turnouts being in gauge.  If it is moving too slowly it hits the points and frogs and noticably slows or stops.  Grades are not as bad as turnout problems.  There are no nose or back end grab irons, and no guide bumps for them.  However, there is rumor a company does make the template for it.  I'm not sure who but that is what Google is for.  Overall, with a good weathing job and a few extra details this will be a good looking and respectable locomotive.  I threw on some MU hoses from Details West, and did a quick job on the truck sideframes.  I sprayed them with Model Master Dark Tan then dry brushed them with grimy black.  Once it is done I will be more than pleased with the locomotive.


There is going to be some further weathering.  I am not sure how I will do it or how heavily.  I am also looking into a way to put figures into the cab as that would be a neat detail at train shows and when the club has visitors.  I hope to eventually have another one to pair up with this one to be able to perform more prototypical operations.

As always, I am open for comments, questions, and suggestions.  Until next time.

Wednesday, March 16, 2011

Changes

Okay so there is a new layout around here and a new header (edit: turns out there is a trademarked Model Railroad University so I have to change this one) and that means things are finally getting under way here.  I'm on spring break but when I return I will have a sound only decoder to put in my HO engine, and I will explain how I weathered my first car in HO.

Til next time.

Thursday, February 17, 2011

Howdy!

Growing up in Texas, I was greatly influenced by the beautiful scarlet and gray locomotives of the Southern Pacific passing near my home.  I remember almost crying when I heard they were acquired by Union Pacific.  So naturally when I became serious about modeling, I gravitated towards the friendly SP.  However, I have always been charmed by the colorful paint schemes and beautiful scenery of the more northeastern rail lines.  The Chessie system I feel is the most colorful of them, and easy to research to boot.

My ultimate goal for the hobby is to build a large N scale layout based on the Southern Pacific Lines routes from Beaumont, to Houston, then Dallas in Texas.  Running long trains across great expanses of track is one of the best parts of model railroading to me.  However, due to my student status, I cannot begin building this grand dream until I graduate (soon hopefully) and settle down.  Now, my current layout does not allow me to run multiple, long trains over long distances, so I started looking for other options.  That is when I found a local HO club with a large layout and friendly folk, so I signed up.  Since their layout is freelanced, I have no dedication to modeling the SP, and can let my northeast tendencies take over.  It also works well as I started off the hobby in HO and have a lot of rolling stock left from the early years.

As a college student, I understand the constraints of finances on the modeling world.  Loans, rent, tuition, food and other things are very demanding on the pocketbook.  Fortunately I found a part time job thanks to my girl, and I can afford these things with a little leftover to fuel my passion for trains.  In this blog, I will be covering my mediocre attempts to be a decent modeler in both scales.  In N scale, I will be showcasing the work on my modest 3' x 5' layout, and in HO the work on my locomotive, rolling stock, and possible modules.  As for now, I have spoken enough.  Feel free to leave criticisms, and contact me wtih  questions, etc.  The point of this blog is share my opinions and ideas, and you are welcome to do the same.