Sort of! Okay, to be perfectly honest, I love it. It is cheap, simple, quick and it works. However, some people may not like it. To them I say: do what is best for you! Model railroading is a large open community and if we didn't do what we wanted, it wouldn't be fun. Me, I am going to use spray paint. Since I started looking into this weathering system back with the original use on the Geep I have made some advances in technique and application. Let's review:
The spray paint cannot be thought of in an airbrush way. You cannot thin it down, dial back the pressure or ramp it up, and you cannot affect the spray area to smaller or larger area. It is constant, in all manners.
"But if it is so hard to change it, why use it?" Simple. It's cheap. And because I have been able to mostly counteract the negative things above.
Now for how I advise you use it. First is selecting the paint. Contrary to intuition you do not want to go for the name brands or the "quality" ones. These are good for other applications but not this. They put out a lot of paint for good smooth coverage. Not the ideal situation for weathering. Pick up the store brands or generics. These give the smallest amount of paint required and also give more bang for the buck. Be very sure to get flat paints.
The gloss will shine once they are applied and look off. Always be sure to go flat unless you need shiny. Once you have the paints, make one of these:
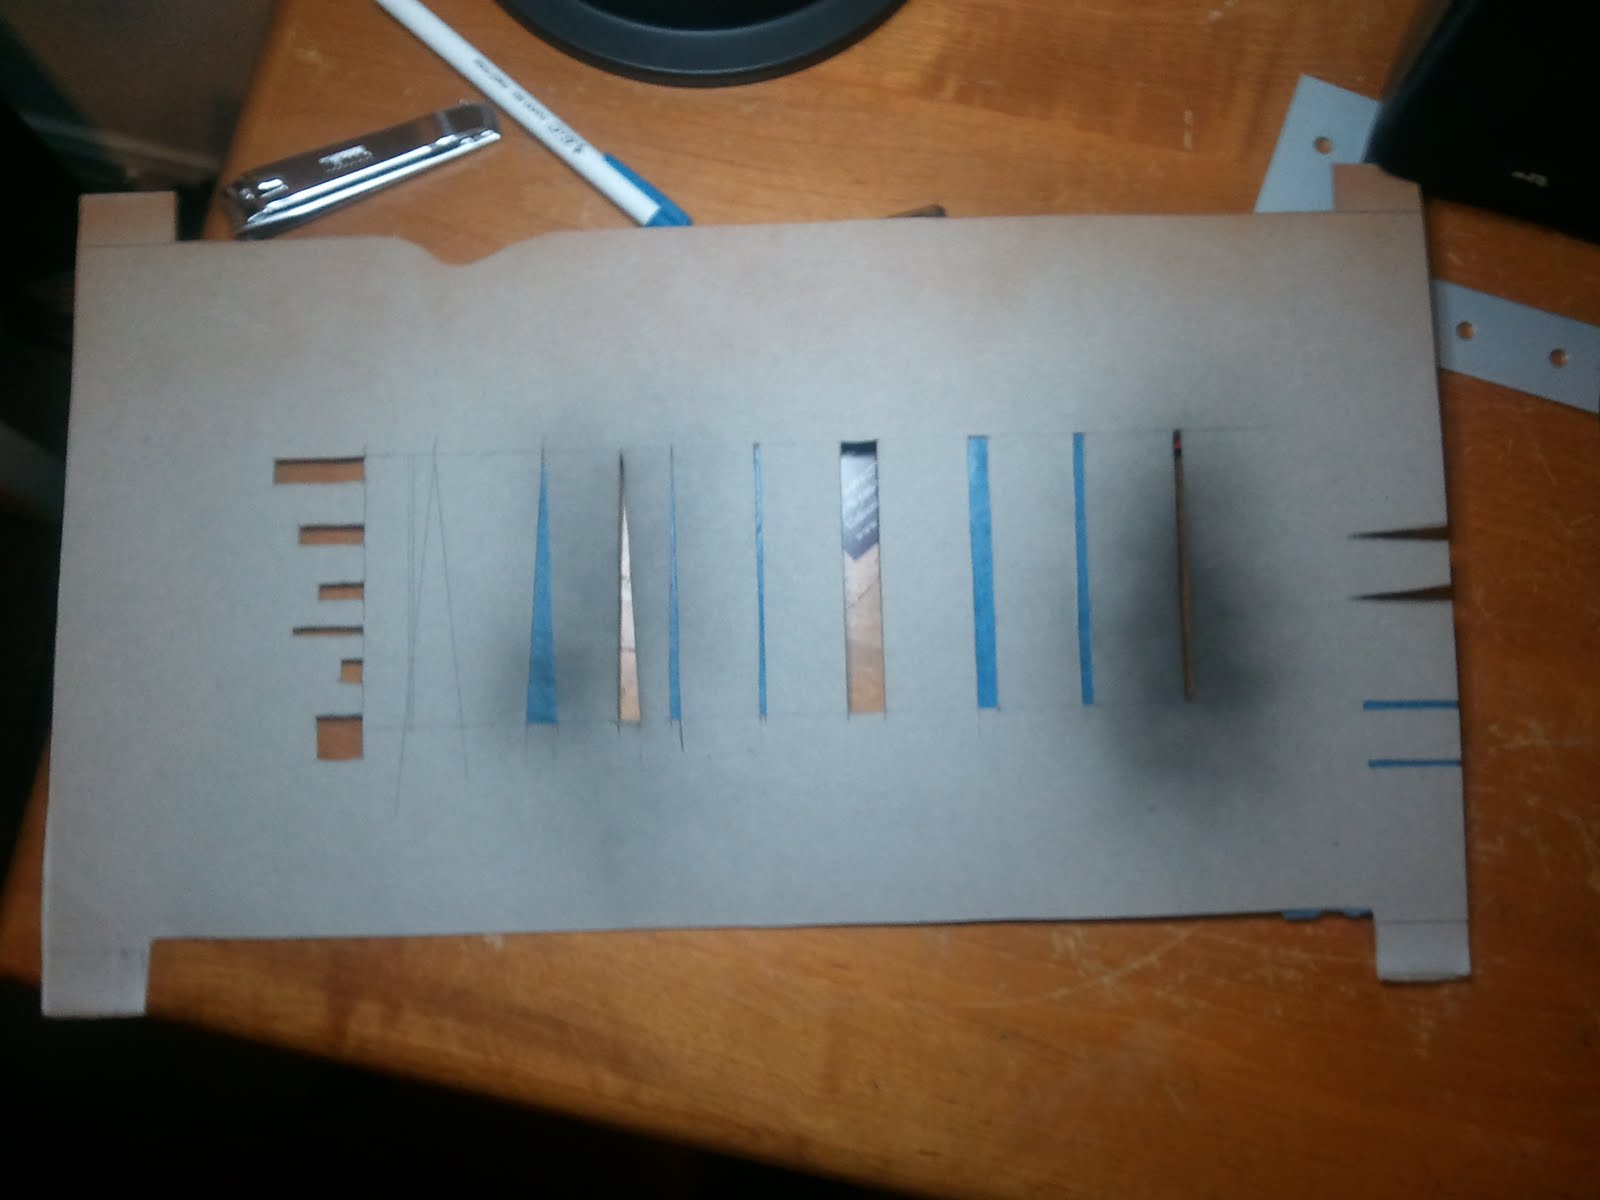
This is the template I made for basic shapes. Mine is made from a box I got a sweater in. It is thin, stiff, and was close enough I didn't have to get up. :) The bottom is for getting that dust or dirt color along the bottom of cars, and the top is for the locomotive as it has the indentation for the wave. The wave is where the aerodynamics of the train causes a rise that drags dirt up with it. Usually this is located around the cab, but prototype photos show the best places. There are lines and triangles for various streakings and point weathering. The 4 on the right are for showing where the dirt is kicked up onto car ends from the other cars wheels. They are in gauge with the rails and wheels. If you do not want a noticable line showing you used a mask, hold the template about an inch or two from the model so that it can fade around it. For crisp lines that show specific edges, hold it as close as possible. You can add or remove things as needed. If the pattern openings are too close together, then use painters tape to cover over unwanted openings (as seen above).
Now for colors. Choose what you like best. I have a white for fading the overall car, a tan for dust and other dirt effects, and a black for grime and wear. You can have more or others, it is really up to you!
Last but not least, technique. Since you cannot control the amount of pain being sprayed, you must control the movement. Short quick passes are best. If you do not want a lot of weathering then do not spray at the model but at the ground in front of it. Some of the spray will carry onto the model without being overkill. Remember, as with airbrushing it is easier to make it heavier than to make it lighter, so go easy and check your work constantly. I do every few passes just to be sure.
A downside is that the spray is not as fine as an airbrush so if you look reeeeeeeally closely you can see the dots of paint. This can be negated by using pastels or other methods of weathering to even out. Ultimately it works for me, and I have enjoyed it immensly. Here are two of the cars I have used this on:
So there you have it. A neat and simple way to weather your cars. As always, feel free to leave questions and comments. Have fun and good luck y'all!
Showing posts with label Rolling Stock. Show all posts
Saturday, May 28, 2011
Monday, May 2, 2011
The caboose project
Okay so I bought the Chessie System geep and it didn't look right. It seemed ...lacking. I wasn't sure why so in looking at a book with a lot of pictures of the Chessie back in the day it hit me! There was not a caboose on the end of my train. I felt like that was what I really needed to round out the short train I have. So I head down to the lhs and scrounge through the piles with no luck. When the owner asked what I was looking for, I told him and he said he would order it for me. I thought "hey this is cool, shouldn't be expensive either." Turns out it was $15 bucks for a Bachmann Chessie caboose... While I have enjoyed their geep, their caboose is, well, crap... Seriously few details, sits up way to high, no running boards, no grab irons, no window glass, no nothing. And for the same price I can get a beautiful Athearn model. So I set to work making something out of not much. First, I removed the trucks and wheels.
That is all I removed. This is as simple as it comes. I bent the smokestack accidentally when it fell from my hands during the removal process.
Here is the underside. Pretty typical. I kept this part in case I needed parts later.
Next I dissassembled the major components. Here we see the body, cab, underbody, and weights. Typically this sort of disassembly isnt necessary. However, I wanted to paint the interior of the caboose black. This makes it look more prototypical since it cancels out a lot of the light that shines in those windows. I brush painted some Polly Scale Engine Black on the interior. Spraying would have gotten overspray out of the windows onto the body.
The result is seen above.
After the first two washes, I trimmed some painters tape into a thin strip and layed it where the walkway should have been, if this model would have had one... Then I drybrushed some model master rust onto the roof to simulate use and abuse. Drybrushing is done by putting a small amount of paint onto the brush, wiping all but a trace amount off on a paper towel, and then lightly brushing the surfaces. Here I went pretty heavily.
The above photo is the during of drybrushing.
And here is the after photo. Worked pretty well in my honest opinion :)
I did a little weathering with powdered pastels to even the overall look out. I also cut into the body to make wreck cracks. Once that was done, I sealed the powders and washes on with a coat of Testors Dullcoat. I dullcoated before the windows were added because for some reason it "frosts" the windows. I found this out the hard way... Another hard lesson is to not dullcoat until you are very sure you are done. If you apply a wash with rubbing alcohol over dullcoat it turns all of the dullcoat white. Again, hard lesson...
Now for the next part. I needed a material to make windows, and when I found clear styrene sheet, I almost passed out at the sight of the price tag. There was no way I could use that stuff and call this a blog for modeling cheaply... When I got home that evening, I decided to open my new racquet ball goggles. As I was struggling with the bad word blister packaging, it hit! Use that stuff! There is always a lot of it and normally it just gets thrown out. So I cut it into the right sizes and it worked beautifully! I was even able to use and Xacto blade to carve cracks and holes into the windows.
Then came the next major part.
I wanted a simple flat car for this thing to be towed on. So again I went to the lhs and found a perfect fit. A Walthers Trainline 50' flat car.
I won't lie to ya, I got this from Model Railroader magazine. The article showed how to weather a deck and it worked perfectly. I painted the deck reefer gray and then a few individual boards with the various colors above. Then I got all over it with a weather wash of heavy concentration and then powder pasteled the snot out of this thing, followed by a quick dullcoating. It was a quick job and resulted in a great looking flat car that has been around the block a few times. Then came mounting the caboose. To keep it in place on the prototype, support bars were placed in the points along the side of the flat car and it was strapped down. To do this I trimmed some toothpick bodies to size and then test fit. When I was happy with the results I stained them with the weather wash.
After they dried, I put them into the load lugs, and settled the caboose into its new home. Then I detailed the caboose's wheels and axels and built a small carriage for them. Then I was finished! Here, ladies and gentlemen, is the long awaited final product!
Ain't it a beauty? I am so glad at how it turned out. Even the guys at the club who have all been doing this stuff for years approved of it. So anyway, this has taken a good 2 hours to write so I am now going to go take a nap then play with trains some more! Good luck in your endevours everyone!
That is all I removed. This is as simple as it comes. I bent the smokestack accidentally when it fell from my hands during the removal process.
Here is the underside. Pretty typical. I kept this part in case I needed parts later.
Next I dissassembled the major components. Here we see the body, cab, underbody, and weights. Typically this sort of disassembly isnt necessary. However, I wanted to paint the interior of the caboose black. This makes it look more prototypical since it cancels out a lot of the light that shines in those windows. I brush painted some Polly Scale Engine Black on the interior. Spraying would have gotten overspray out of the windows onto the body.
The result is seen above.
The above photo shows the exterior after a weatherwash and body work. I wanted to smooth the bottom of the body so it would work with the next major part of the project. I also melted teh overhanging roof parts to lend credibility to the "wreck" look. The weather wash is a simple weathering technique that is commonly used. It involves mixing a few drops of india ink (or in this case, a whole lot) into a bottle of 70% isopropyl alcohol. Then you drag a brush load of it over the surface you want to weather and the wash does the work. The alcohol quickly goes into the smalled nook and cranny of the surface and when it evaporates it leaves behind the ink which highlights the smallest parts. A fun technique with a lot of potential. Especially since it can be as light or dark as desired.
The above photo is the during of drybrushing.
I did a little weathering with powdered pastels to even the overall look out. I also cut into the body to make wreck cracks. Once that was done, I sealed the powders and washes on with a coat of Testors Dullcoat. I dullcoated before the windows were added because for some reason it "frosts" the windows. I found this out the hard way... Another hard lesson is to not dullcoat until you are very sure you are done. If you apply a wash with rubbing alcohol over dullcoat it turns all of the dullcoat white. Again, hard lesson...
Now for the next part. I needed a material to make windows, and when I found clear styrene sheet, I almost passed out at the sight of the price tag. There was no way I could use that stuff and call this a blog for modeling cheaply... When I got home that evening, I decided to open my new racquet ball goggles. As I was struggling with the bad word blister packaging, it hit! Use that stuff! There is always a lot of it and normally it just gets thrown out. So I cut it into the right sizes and it worked beautifully! I was even able to use and Xacto blade to carve cracks and holes into the windows.
Then came the next major part.
I wanted a simple flat car for this thing to be towed on. So again I went to the lhs and found a perfect fit. A Walthers Trainline 50' flat car.
I won't lie to ya, I got this from Model Railroader magazine. The article showed how to weather a deck and it worked perfectly. I painted the deck reefer gray and then a few individual boards with the various colors above. Then I got all over it with a weather wash of heavy concentration and then powder pasteled the snot out of this thing, followed by a quick dullcoating. It was a quick job and resulted in a great looking flat car that has been around the block a few times. Then came mounting the caboose. To keep it in place on the prototype, support bars were placed in the points along the side of the flat car and it was strapped down. To do this I trimmed some toothpick bodies to size and then test fit. When I was happy with the results I stained them with the weather wash.
After they dried, I put them into the load lugs, and settled the caboose into its new home. Then I detailed the caboose's wheels and axels and built a small carriage for them. Then I was finished! Here, ladies and gentlemen, is the long awaited final product!
Ain't it a beauty? I am so glad at how it turned out. Even the guys at the club who have all been doing this stuff for years approved of it. So anyway, this has taken a good 2 hours to write so I am now going to go take a nap then play with trains some more! Good luck in your endevours everyone!
Subscribe to:
Posts (Atom)


